Once construction was complete I painted the entire
project with inexpensive white flat paint to give me a
blank clean surfact to work on.
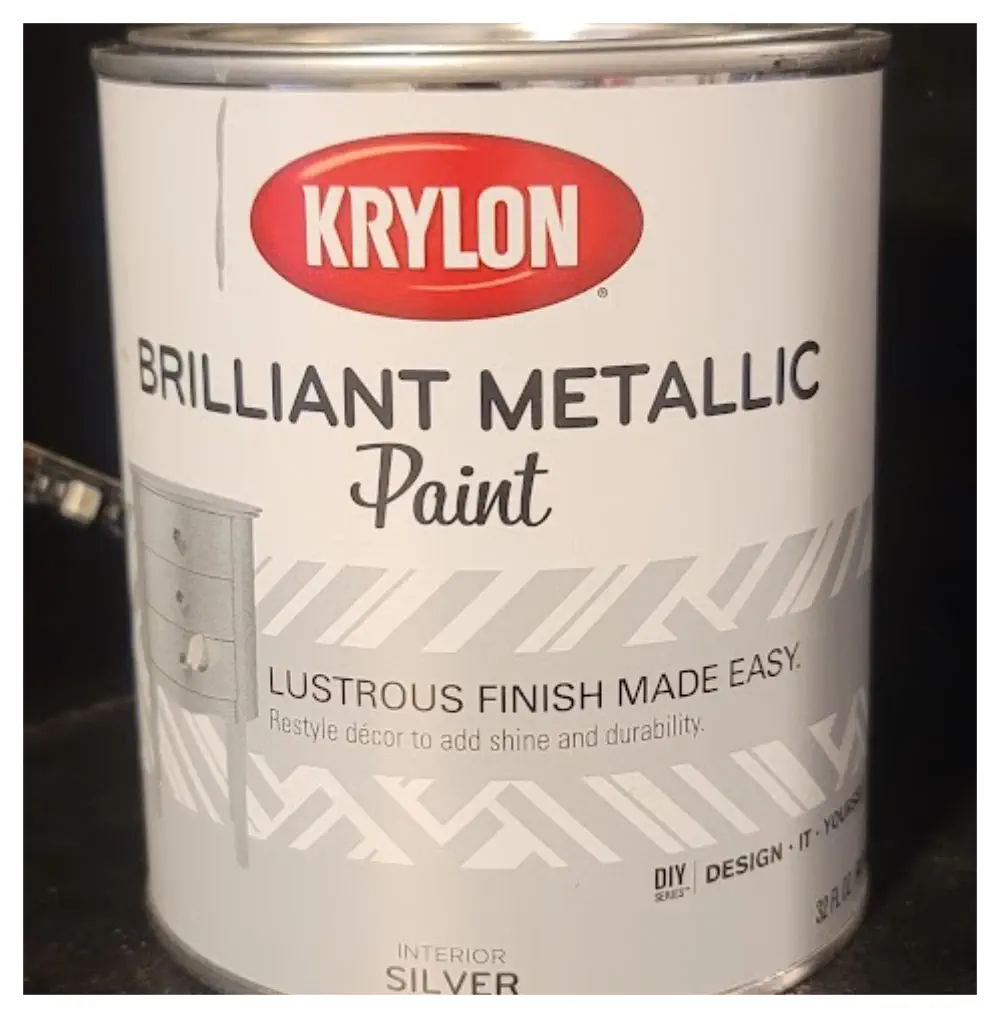
We decided to paint our Boombox a more traditional
Boombox color of silver to resemble the metal look
from the 80’s and 90’s. This silver Krylon paint was
the perfect color and worked great to give that effect
I wanted. I also painted the back of the bar top with
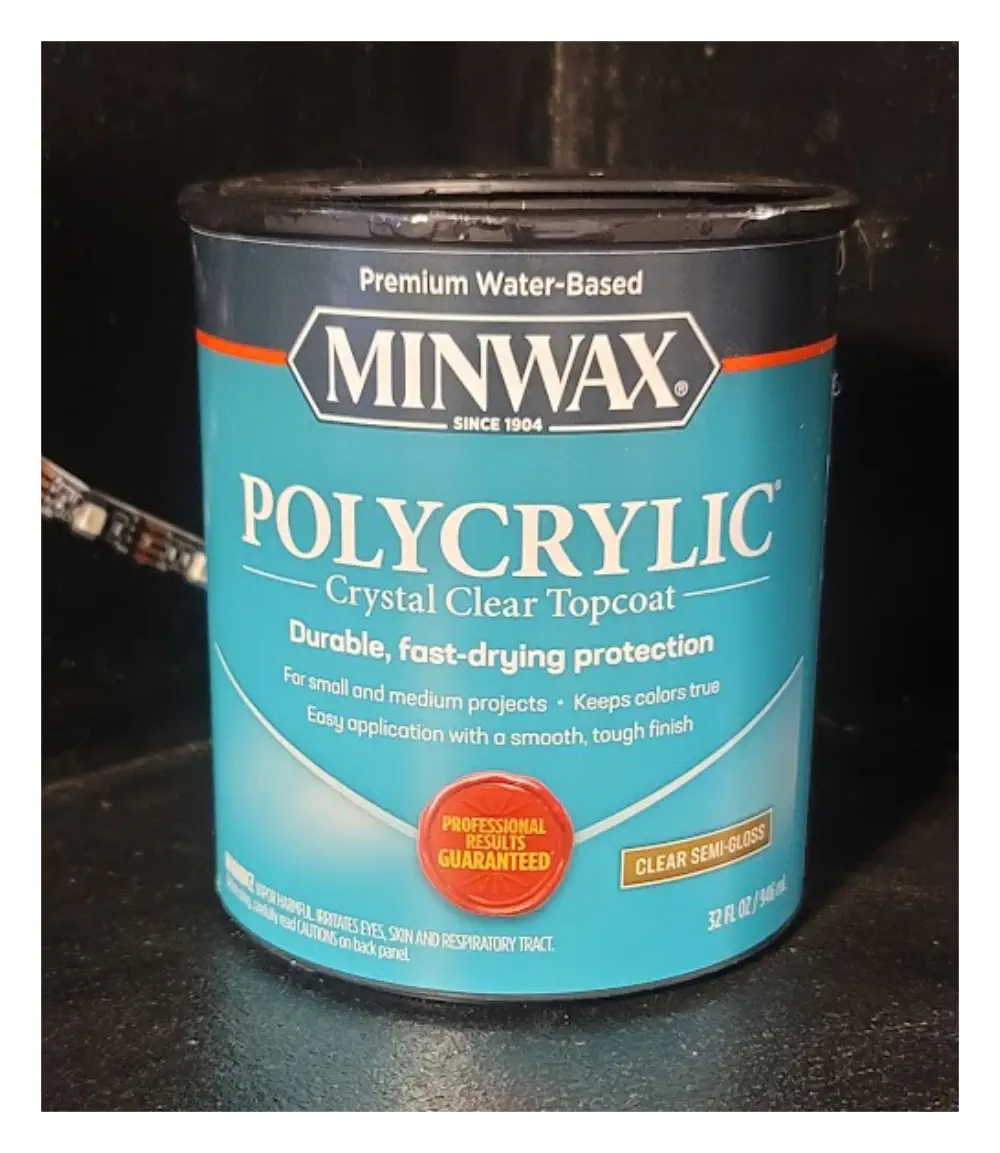
black craft paint. To seal the paint and vinyl stickers
plus to make it easy to clean we gave the whole
things 3 coats of polycrylic before attaching the
knobs and buttons.
I created and cut all of the vinyl stickers using my
Cricut Maker. If you are a crafter and don’t have a
Cricut already, I highly recommend it! It is worth
every penny. I got mine about a year and a half ago
and I have used it for so many projects. For this
project I used neon green, purple, neon pink, and
neon blue adhesive vinyls which provided excellent
details.

Paint and Vinyls
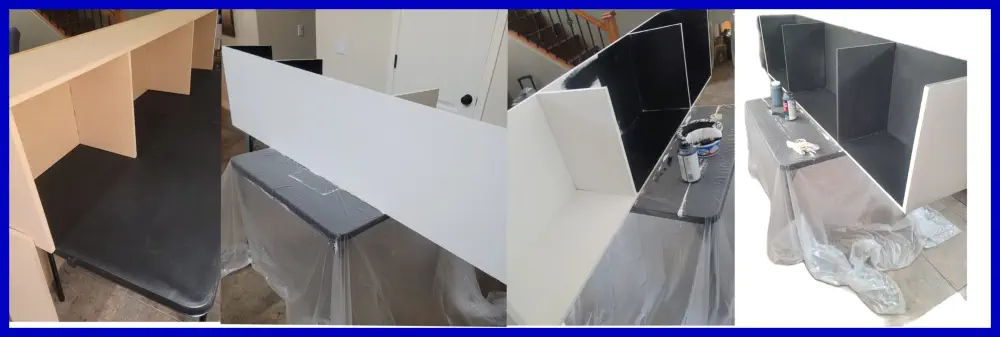
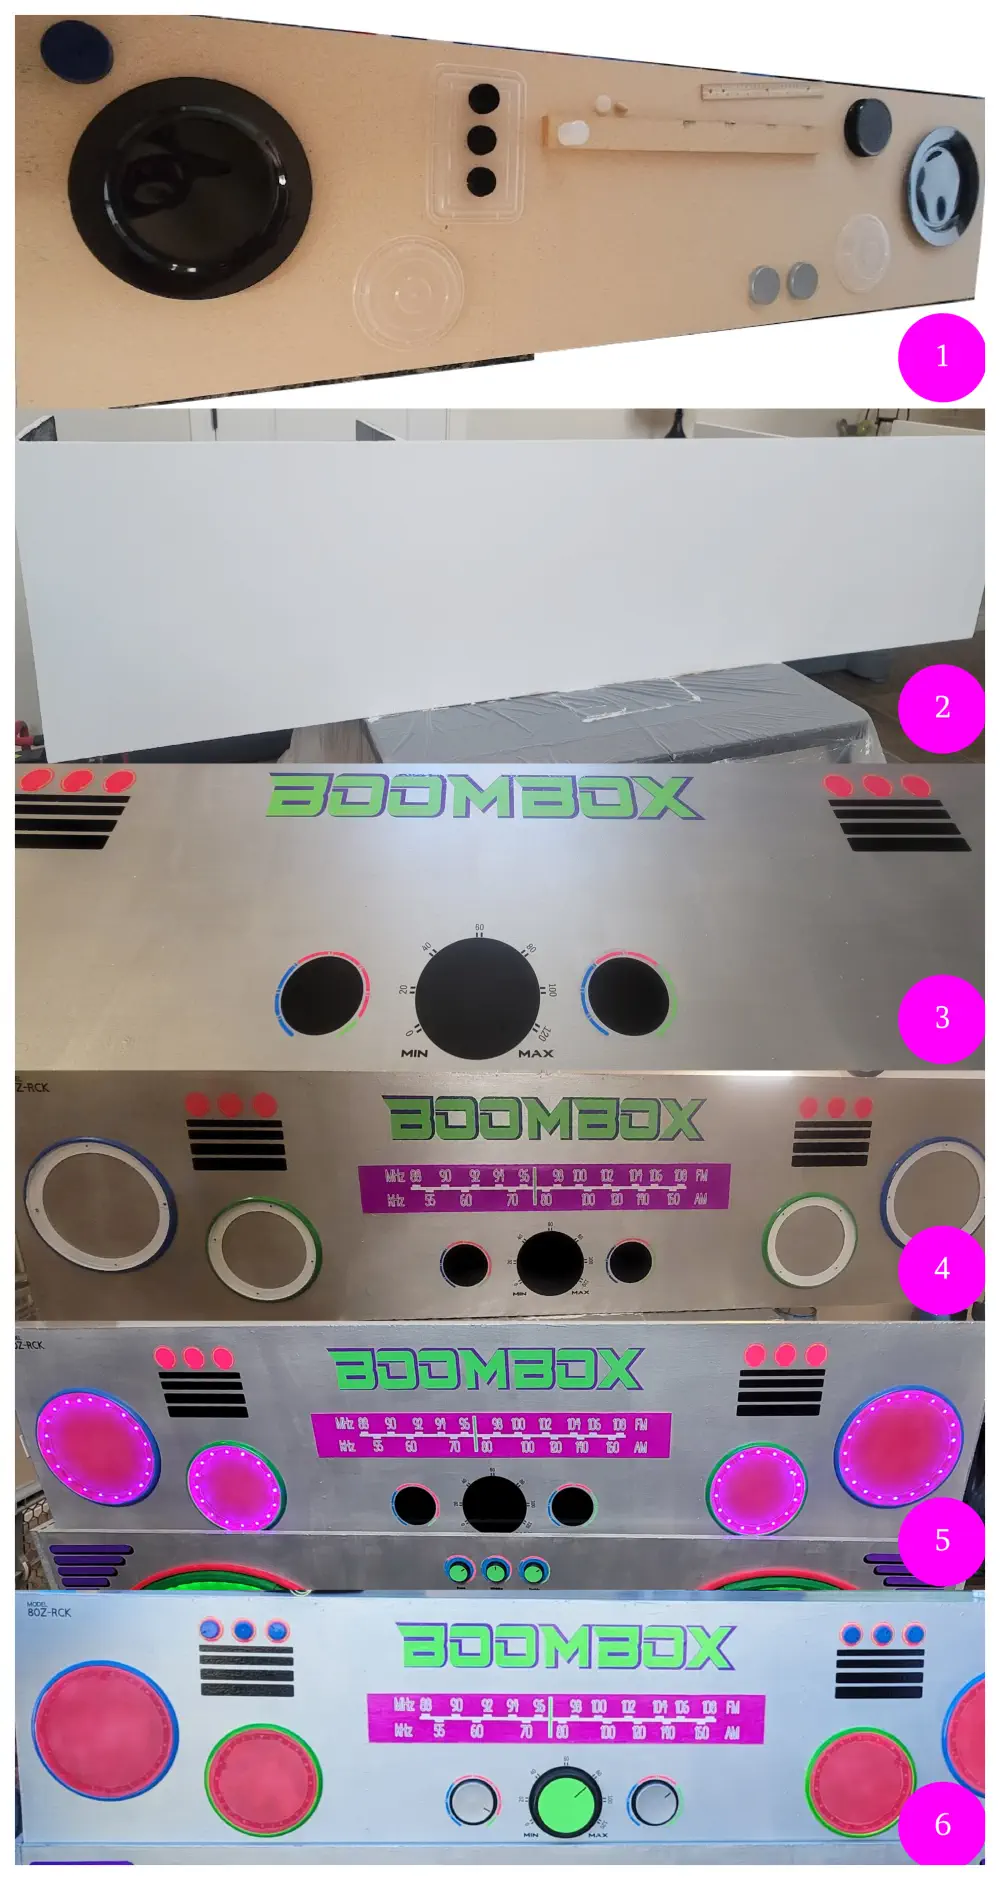

Boombox Bar/DJ Booth upper half progression

1.
Start with blank 1 ½ ft. x 6 ft.
particle board and lay out
initial design using caps, lids,
and paper plates.
2.
We painted the entire
surface white and then the
back of the bar was painted
black and finally the front
was painted with silver.
3.
Details were added with vinyl
stickers in various neon
colors.
4.
We attached speaker grate
covers that we spray painted
in neon colors and used a
piece of cardboard that we
painted purple to act as the
radio tuner.
5.
Before the speaker covers
went on we drilled small
holes and added battery
operated LED light strips so
they would glow.
6.
Then all we needed to do
was attach the knobs with
some glue and it was
complete!
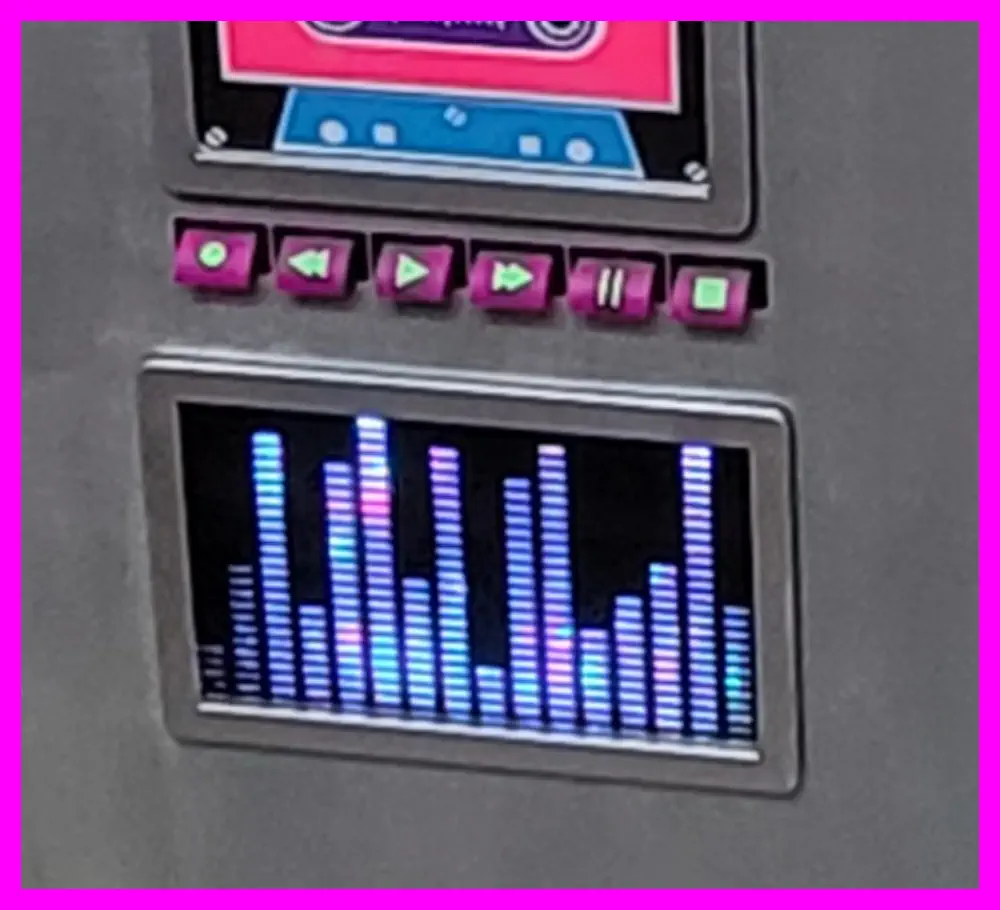
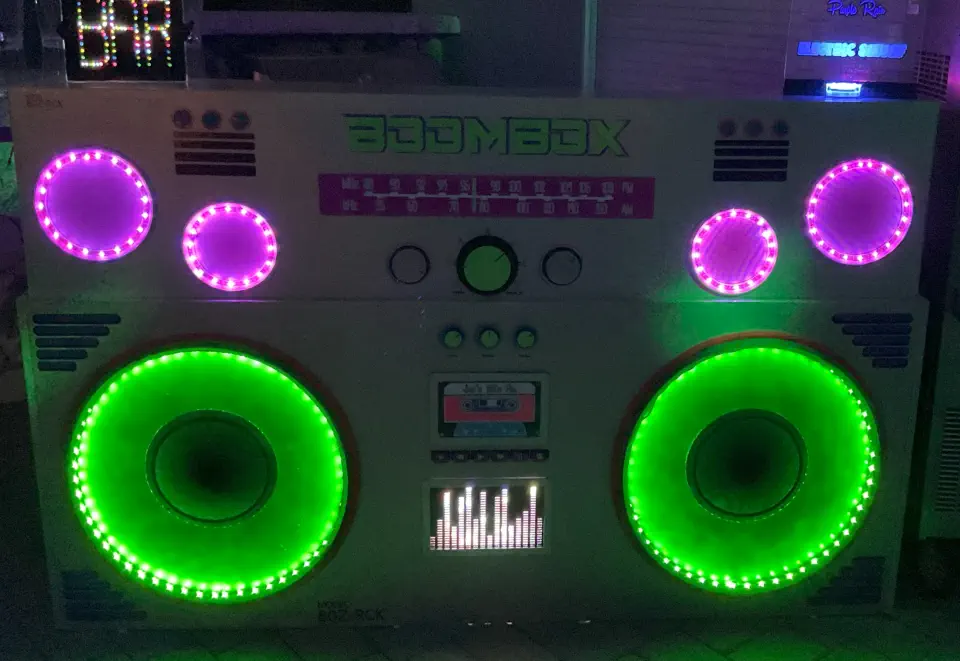
The equalizer on the Boombox was a really cool detail that
seemed to move with the beat and gave a great added effect.
Above is a look at the back of the Boombox so you can see how
the equalizer works. The frames for the tape deck and
equalizer were actually packaging for tablet covers. We just
happened to have them laying around. They worked out perfect
for this project but I have seen others use paper trays to also
create this look. We bought acrylic sheets which we cut to size
to give the look of glass. Then using my Cricut I made the
equalizer bars out of black vinyl which I attached to the acrylic
sheet. On the back using a plastic storage container from the
Dollar Store we stuffed the container with these amazing
twinkling lights and covered them with two layers of bubble wrap
to soften the look from the front. The lights are battery operated
so we just used a portable power bank to give them power.
Boombox Bar/DJ booth Equalizer
Introverted Party Planner
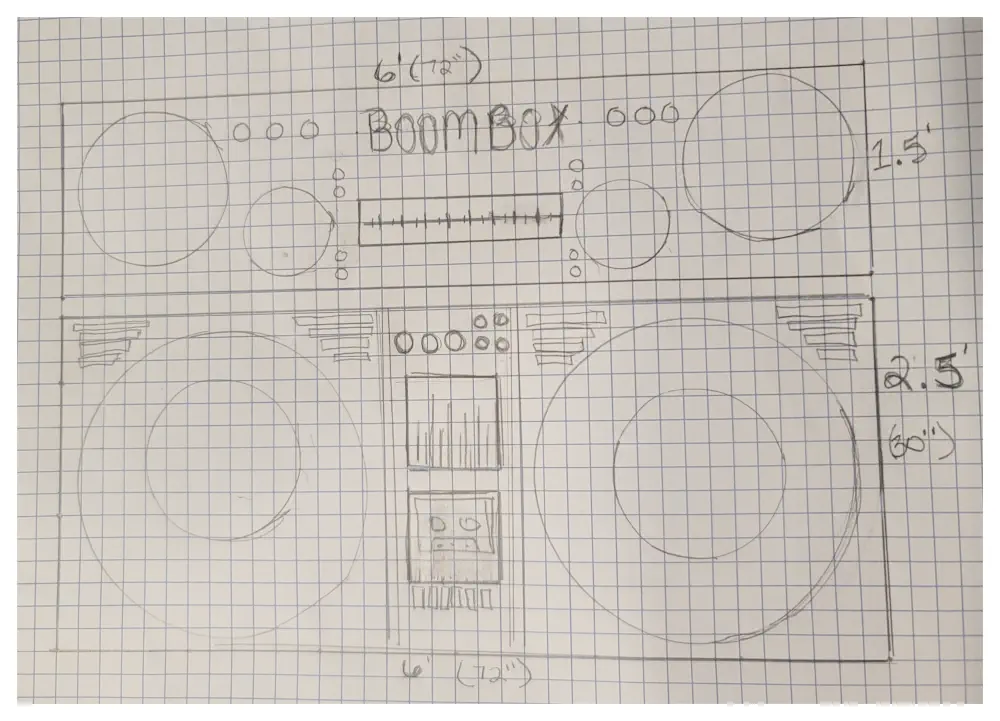
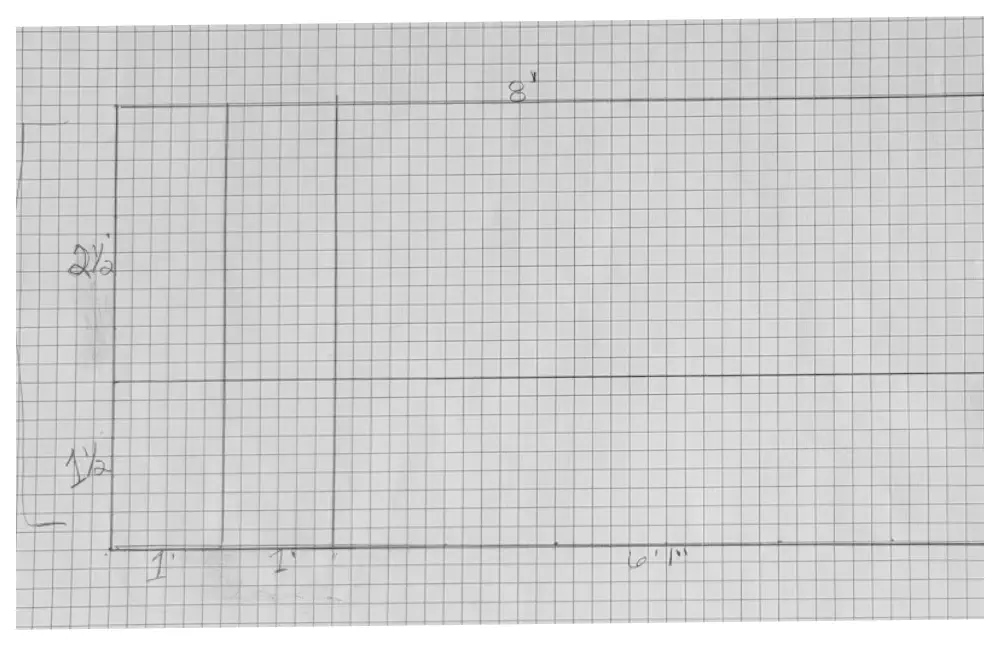
After looking at other designs and getting a good idea of how to complete the
project, I started by drawing out my basic plans with dimensions on graph paper.
I planned to make the body of the Boombox out of particle board from Home Depot
so I knew I needed a cut list. As you can see above, I drew the 4x8 sheet of
particle board and determined how many pieces I would need and what size to cut
each piece. The bottom of the Boombox was approximately 6 feet wide by 2 ½ feet
tall, the top of the Boombox was 6 feet wide by 1 ½ feet tall. The remaining pieces
where for the side supports to the Boombox.
Once we got all of our cut pieces, we took them home and started laying out the
basic shapes and gathered all of our materials. I knew from other peoples designs
that hula hoops were the perfect size for the large speakers and we started by
using plastic plates to begin the sizing for the speaker holes. We also got
adhesive weather stripping to go around the hula hoops to provide more detail.
Then using some plastic lids we arranged the various button and knobs. My
husband had the great idea of using speaker grate covers for a real authentic
speaker look, while they were not functional speakers it gave the perfect look.
Then all we needed was lots of paint and vinyl for the details.
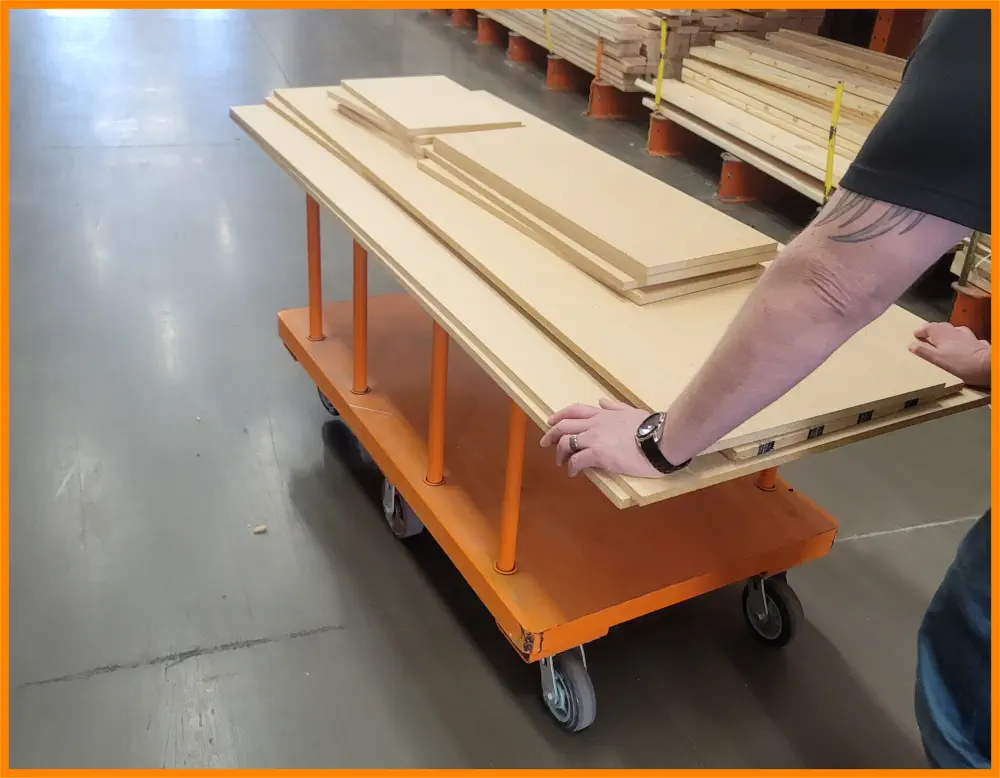
We purchased 2 (two) ⅝ in. x 4 ft. x 8 ft. Particleboard Panels
from Home Depot to make the Boombox body and gave them our cut list which
was great to have them do the straight cutting.
We really only needed 1 full 4x8 sheet but needed the second sheet to create
the bar top and additional support for the top so we cut the second sheet the same
way which gave us 3 extra pieces (2- 1f t. x 2 ½ ft. and 1- 6 ft. x 2 ½ ft.)
to use on another project.

Basic Plans & materials
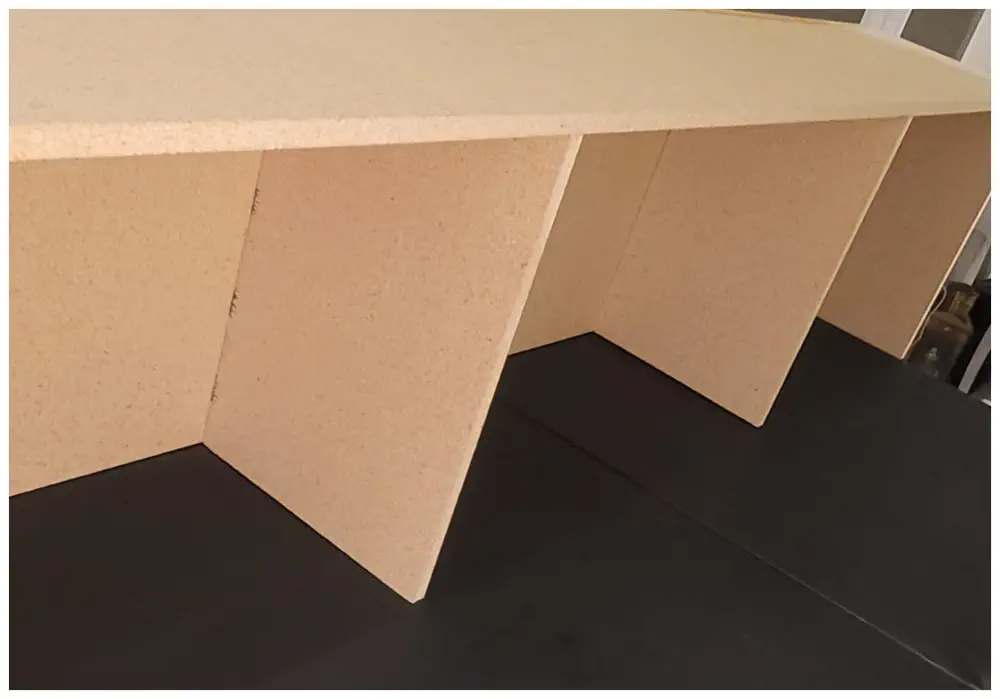
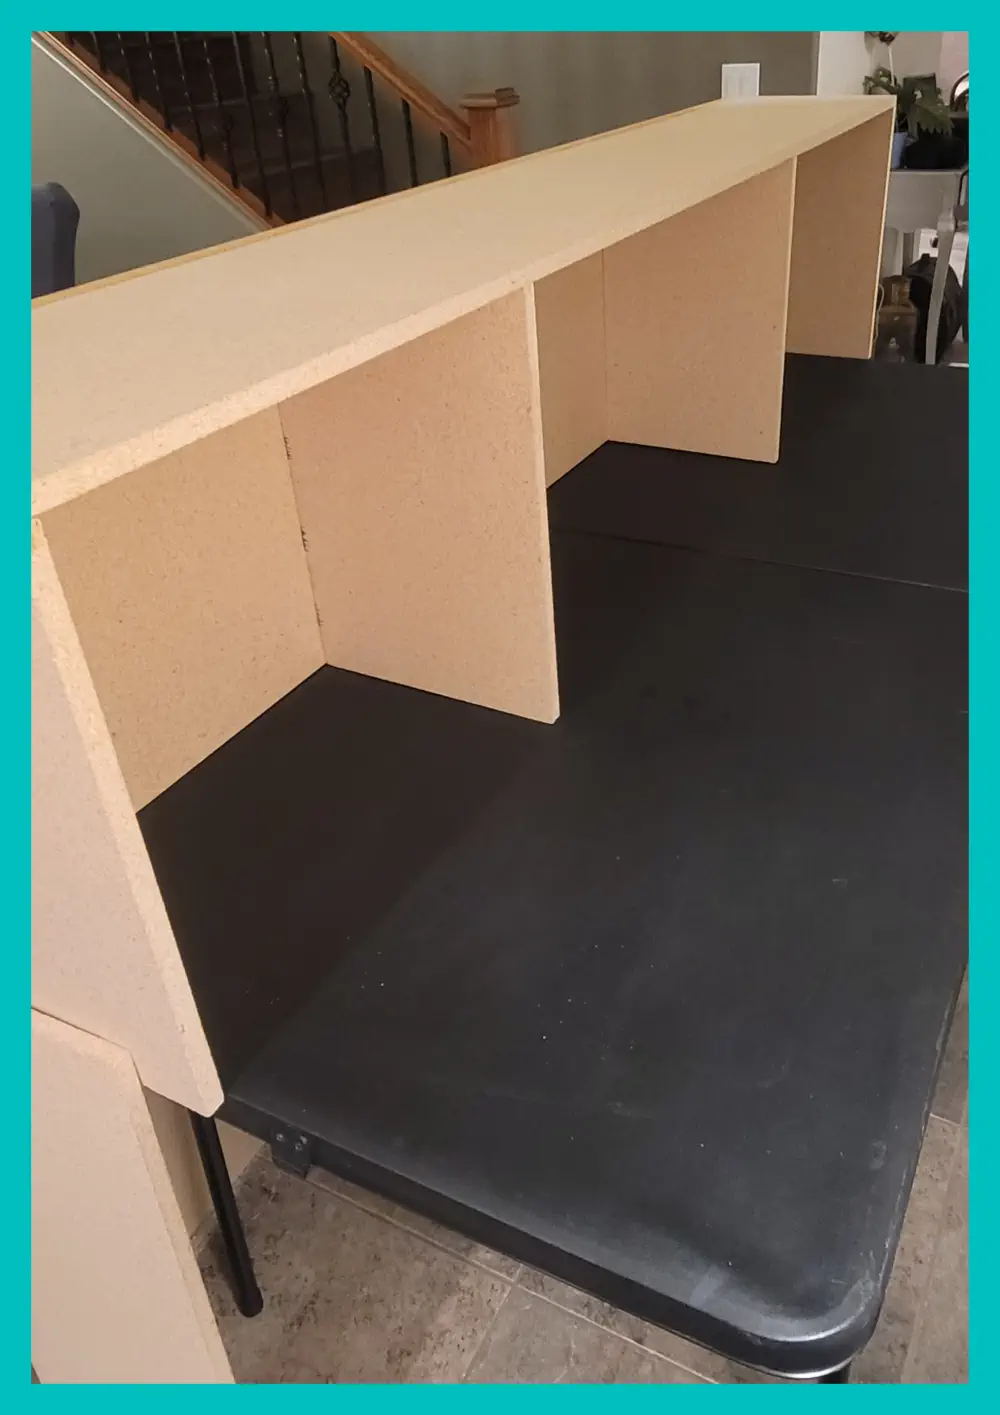
We began assembling the top of the bar which sits on top of a 6 ft. folding table by
using two 1 ½ ft. x 6 ft. long pieces to create the top and the front panel of the
Boombox and four 1 ½ ft. x 1 ft. pieces to create the supports.
We did need to trim off about ⅝ of an inch from each of the 4 support pieces to fit
properly on the table. Then we used wood glue and finishing nails to attach
everything together to make it nice and secure. This created 4 large bays for the
bartender and/or DJ; perfect for all of their needs.
On the lower portion we cut 2 round holes so we could allow sound from a
portable speaker to come through and a hole for the “equalizer” lights. We then
attached the side supports using two 2 ½ ft. x 1 ft. pieces which we attached with
4 hinges (2 on each side) so we could store it better after we were done. By
attaching the sides to the outer edges we were able to slide the lower half around
the folding table. We attached the sides to the bottom portion of the Boombox bar
and DJ booth with hinges and the construction was complete!
Boombox Bar / DJ booth construction


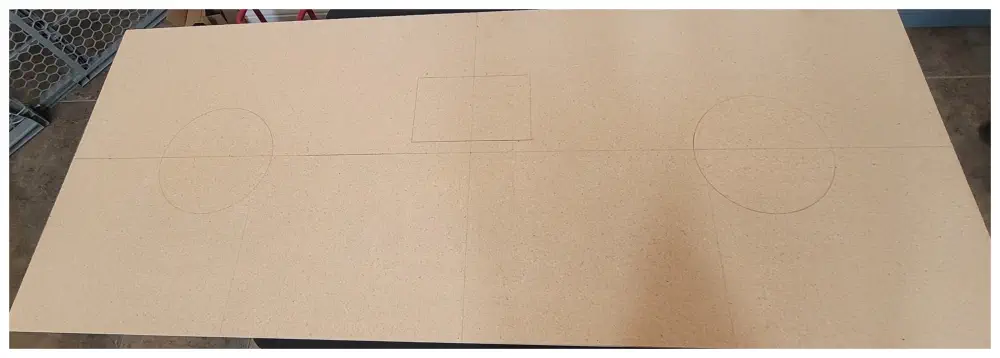
Boombox Bar/DJ Booth lower half progression
1.
Start with blank 4ft.x6ft.
particle board - in pencil
draw out basic shapes for
spacing.
2.
Layout hula hoops, plasitic
lids, plates, tape deck and
equalizer for spacing.
3.
Next we cut holes for
speakers and equalizer
and painted the whole thing
white.
4.
It was then painted silver,
the area behind the hula
hoops were spray painted
in neon green, custom vinyl
decals were put in place,
and the speaker covers,
tape deck, and equalizer
was glued in place.
5.
The end result after adding
LED lighting, and all the
finishing touches!
In conclusion, this Boombox Bar and DJ booth wasn’t a super difficult project to
construct. However, the level of detail is what took the most time. If you are thinking
about making your own Boombox Bar/DJ booth I encourage you to have fun with it
and add your own style and details. It wasn’t until we were ready to attach the details
that we finalized our layouts. We also spent some time gathered lots of container lids
with various sizes to use as the knobs. The buttons to the tape deck were trim pieces
cut into 1 inch pieces and painted. So feel free to get creative you can make it
whatever you want it to be! Thank you for reading! Happy crafting!
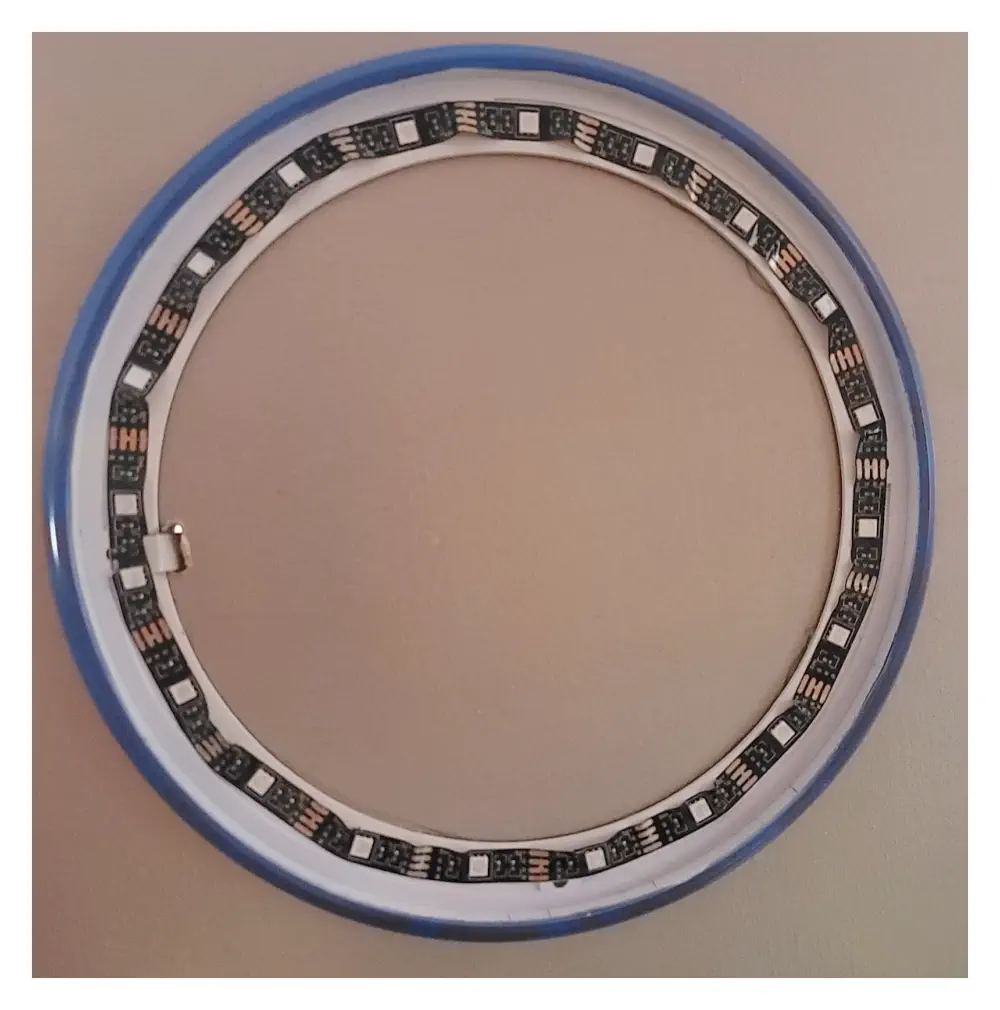
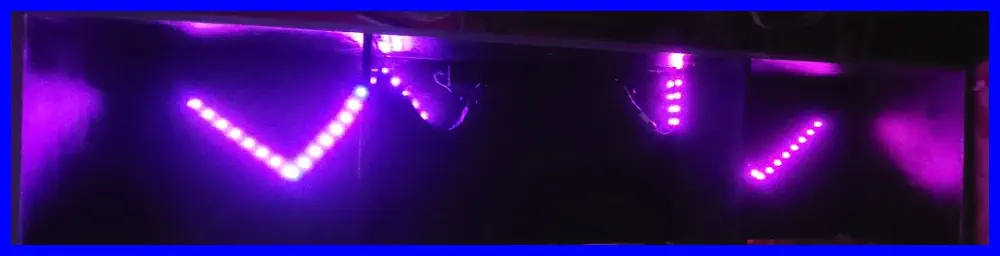
Ligthing was a huge part of this Boombox Bar & DJ
booth. We used four LED light strips for the bottom
and top speakers and a strand of twinkle lights to
give the equalizer the effect of movement.
On the backside of the bar the top light strips were
long enough to provide some lighting along with
some puck lights so the bartender/DJ could see
what they were doing.
We also bought these amazing DJ disco ball lights
which danced with the music.
For our party we used a portable bluetooth speaker
for music. We placed the speaker under the table
and next to one of the speaker holes. Then we
blasted 80’s music all night long.
Boombox Lighting
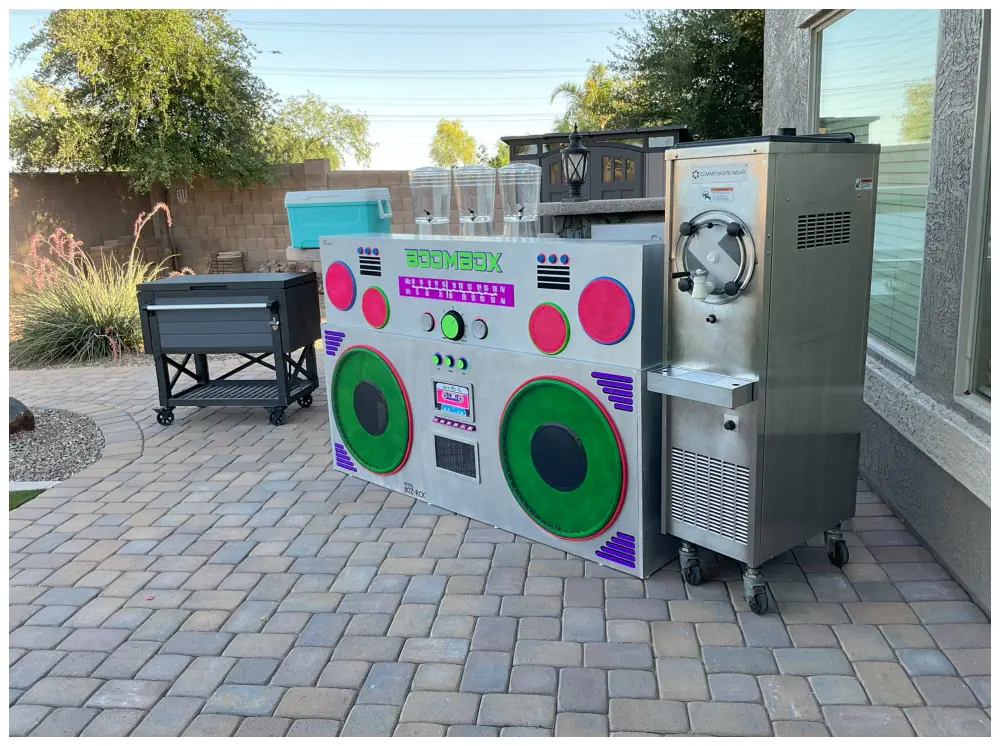
A great party always has a focal point or a real wow factor that gets your guests
excited to party. For our 80’s glow birthday party we created this
Boombox Bar & DJ booth.
This is how we did it and how you can too!
*This site contains affiliate links. For more information see our disclosures here.
My husband and I worked on the Boombox bar and DJ booth
off and on for a few months. However, we were working on several other
projects at the same time. If we had dedicated all of our time to this project I
think we could have completed it in a weekend.
Most of the time we weren’t entirely sure what it was going to end up looking
like as we just had a general plan and lots of ideas.
Table of Contents
1.
Basic Plans and Materials
2.
Construction
3.
Paint and vinyls
4.
Boombox upper half progression
5.
Boombox lower half progression
6.
Equalizer construction
7.
Boombox Lighting

When my husband and I found out we were going to be doing an 80’s party we
began looking for ideas. We knew we wanted to create something BIG and EPIC.
Once we began seeing 80’s/90’s Boombox bars & DJ booths ideas we
knew that we could create one of our own.
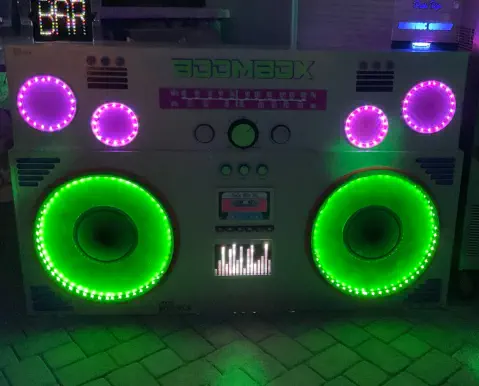
We created this epic Boombox bar and DJ booth to stand 4 feet tall and spans a
6 foot folding table which acts as its support. This Boombox includes lots of
LED lights, custom vinyl stickers, speaker grates, a twinkling equalizer,
and lots of other fun details.


When my husband and I found out we were going to be
doing an 80’s party we began looking for ideas. We knew we
wanted to create something BIG and EPIC. Once we began
seeing 80’s/90’s Boombox bars & DJ booths ideas we knew
that we could create one of our own.
We created this epic Boombox bar and DJ booth to stand 4
feet tall and spans a 6 foot folding table which acts as its
support.
This Boombox includes lots of LED lights, custom vinyl
stickers, speaker grates, a twinkling equalizer, and lots of
other fun details.
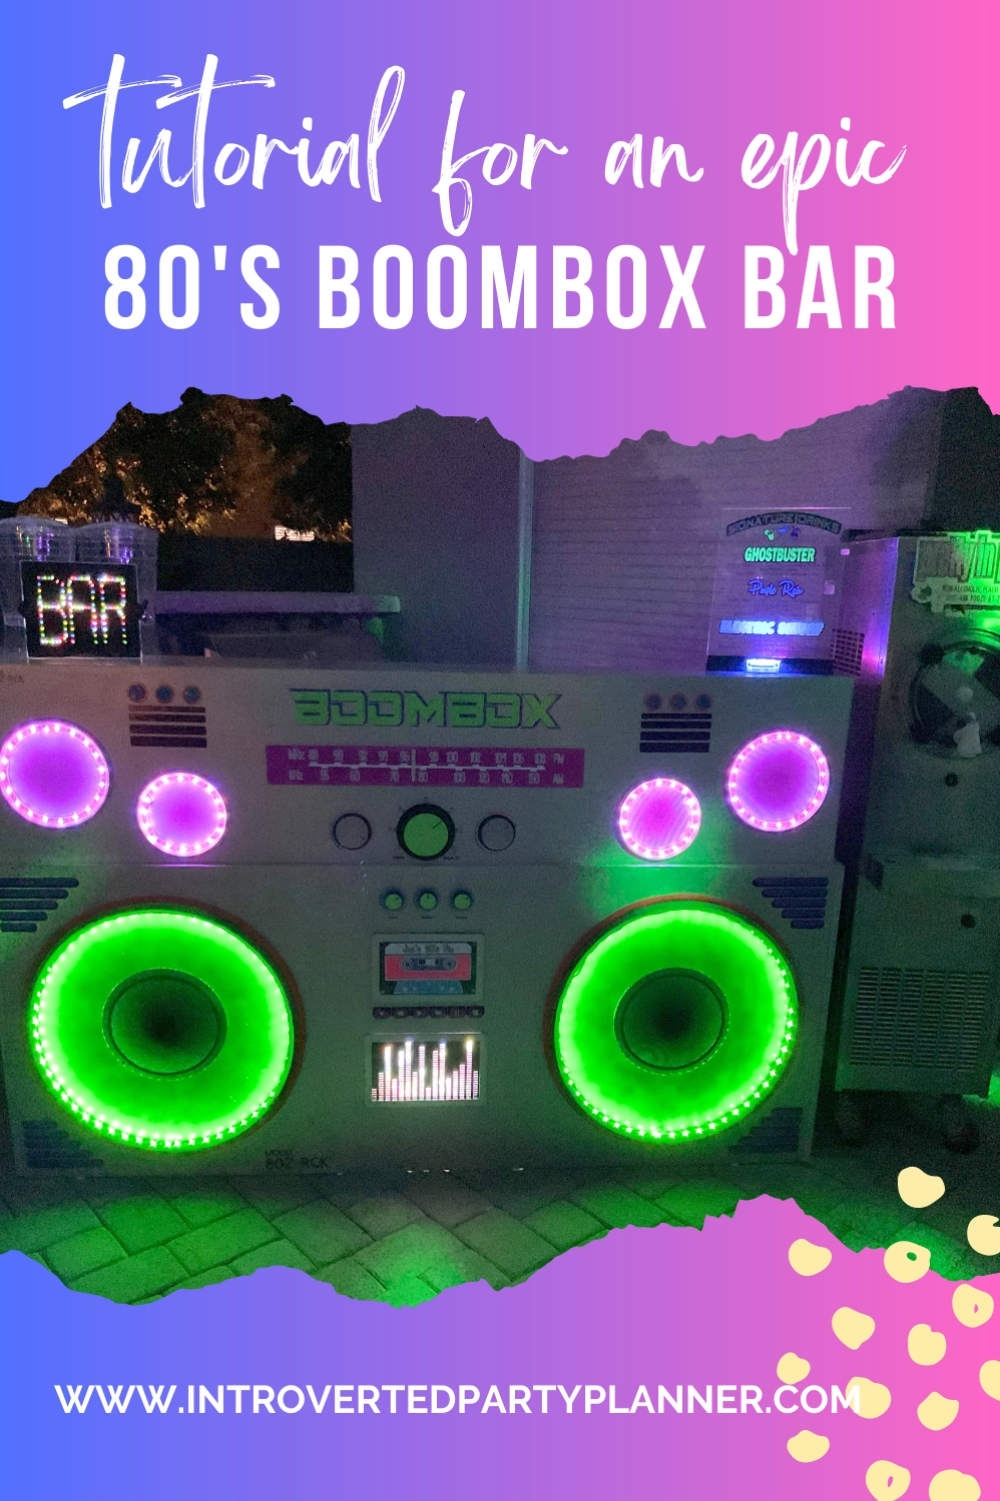
Table of Contents
1.
Basic Plans and Materials
2.
Construction
3.
Paint and vinyls
4.
Boombox upper half progression
5.
Boombox lower half progression
6.
Equalizer construction
7.
Boombox Lighting
My husband and I worked on this Boombox bar and DJ
booth off and on for a few months. However, we were
working on several other projects at the same time. If we
had dedicated all of our time to this project I think we could
have completed it in a weekend.
Most of the time we weren’t entirely sure what it was going
to end up looking like at the end. We just had a general
plan and lots of ideas.
After looking at other designs and getting a good idea of how
to complete the project, I started by drawing out my basic
plans with dimensions on graph paper.
I planned to make the body of the Boombox out of particle
board from Home Depot so I knew I needed a cut list. As you
can see above, I drew the 4x8 sheet of particle board and
determined how many pieces I would need and what size to
cut each piece. The bottom of the Boombox was
approximately 6 feet wide by 2 ½ feet tall, the top of the
Boombox was 6 feet wide by 1 ½ feet tall. The remaining
pieces where for the side supports to the Boombox.
Once we got all of our cut pieces, we took them home and
started laying out the basic shapes and gathered all of our
materials. I knew from other peoples designs that hula hoops
were the perfect size for the large speakers and we started by
using plastic plates to begin the sizing for the speaker holes.
We also got adhesive weather stripping to go around the hula
hoops to provide more detail. Then using some plastic lids
we arranged the various button and knobs. My husband had
the great idea of using speaker grate covers for a real
authentic speaker look, while they were not functional
speakers it gave the perfect look. Then all we needed was
lots of paint and vinyl for the details.
Basic Plans & materials
We purchased 2 (two) ⅝ in. x 4 ft. x 8 ft. Particleboard
Panels from Home Depot to make the Boombox body and
gave them our cut list which was great to have them do the
straight cutting.
We really only needed 1 full 4x8 sheet but needed the second
sheet to create the bar top and additional support for the top
so we cut the second sheet the same way which gave us 3
extra pieces (2- 1f t. x 2 ½ ft. and 1- 6 ft. x 2 ½ ft.) to use on
another project.
We began assembling the top of the bar which sits on top of
a 6 ft. folding table by using two 1 ½ ft. x 6 ft. long pieces to
create the top and the front panel of the Boombox and four
1 ½ ft. x 1 ft. pieces to create the supports.
We did need to trim off about ⅝ of an inch from each of the 4
support pieces to fit properly on the table. Then we used
wood glue and finishing nails to attach everything together to
make it nice and secure. This created 4 large bays for the
bartender and/or DJ; perfect for all of their needs.
On the lower portion we cut 2 round holes so we could
allow sound from a portable speaker to come through and a
hole for the “equalizer” lights. We then attached the side
supports using two 2 ½ ft. x 1 ft. pieces which we attached
with 4 hinges (2 on each side) so we could store it better after
we were done. By attaching the sides to the outer edges we
were able to slide the lower half around the folding table. We
attached the sides to the bottom portion of the Boombox Bar
and DJ booth with hinges and the construction was complete!
Boombox Bar / DJ booth construction
Once construction was complete I painted the entire project
with inexpensive white flat paint to give me a blank clean
surfact to work on.
We decided to paint our Boombox a more traditional Boombox
color of silver to resemble the metal look from the 80’s and
90’s. This silver Krylon paint was the perfect color and worked
great to give that effect I wanted. I also painted the back of the
bar top with black craft paint. To seal the paint and vinyl
stickers plus to make it easy to clean we gave the whole things
3 coats of polycrylic before attaching the knobs and buttons.
I created and cut all of the vinyl stickers using my Cricut
Maker. If you are a crafter and don’t have a Cricut already, I
highly recommend it! It is worth every penny. I got mine about
a year and a half ago and I have used it for so many projects.
For this project I used neon green, purple, neon pink, and
neon blue adhesive vinyls which provided excellent details.
Paint and Vinyls


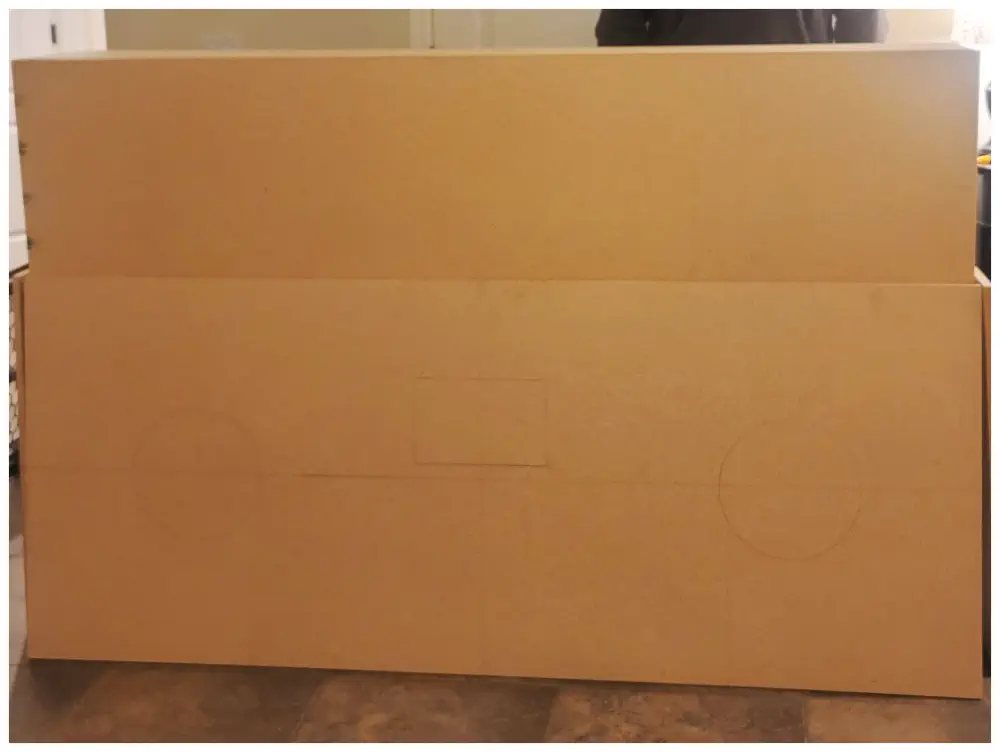
Boombox Bar/DJ Booth upper half progression
1.
Start with blank 1 ½ ft. x 6 ft.
particle board and lay out initial
design using caps, lids, and
paper plates.
2.
We painted the entire surface
white and then the back of the
bar was painted black and
finally the front was painted with
silver.
3.
Details were added with vinyl
stickers in various neon colors.
4.
We attached speaker grate
covers that we spray painted in
neon colors and used a piece of
cardboard that we painted
purple to act as the radio tuner.
5.
Before the speaker covers went
on we drilled small holes and
added battery operated LED
light strips so they would glow.
6.
Then all we needed to do was
attach the knobs with some glue
and it was complete!


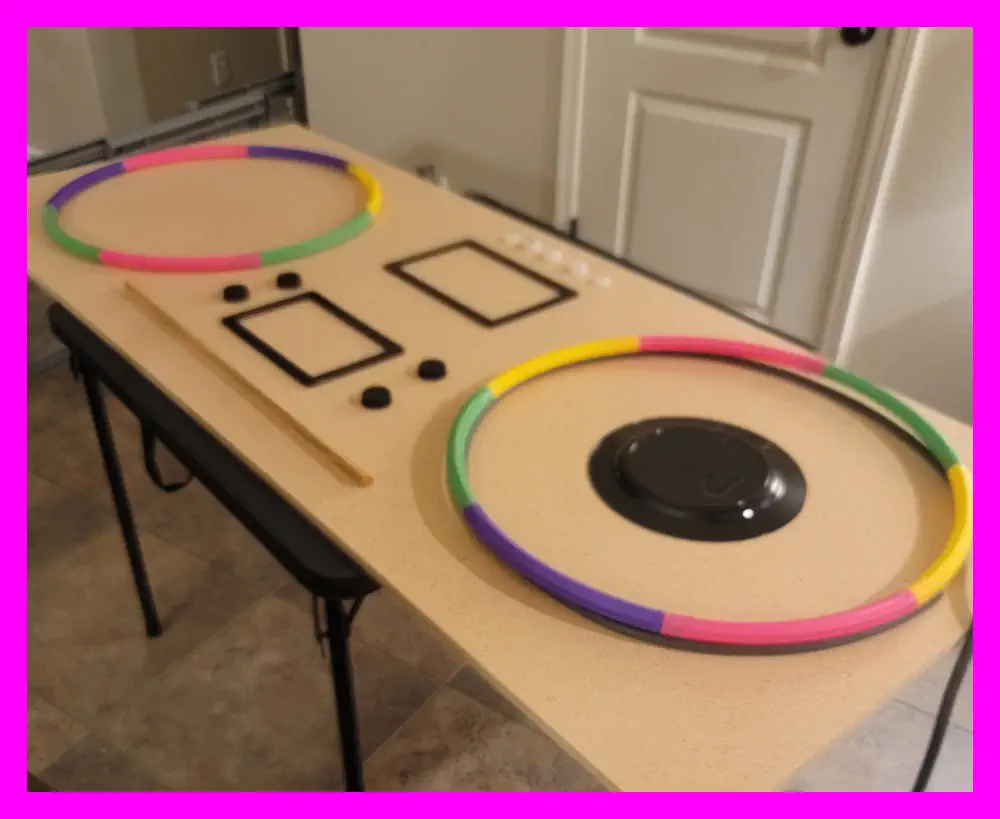
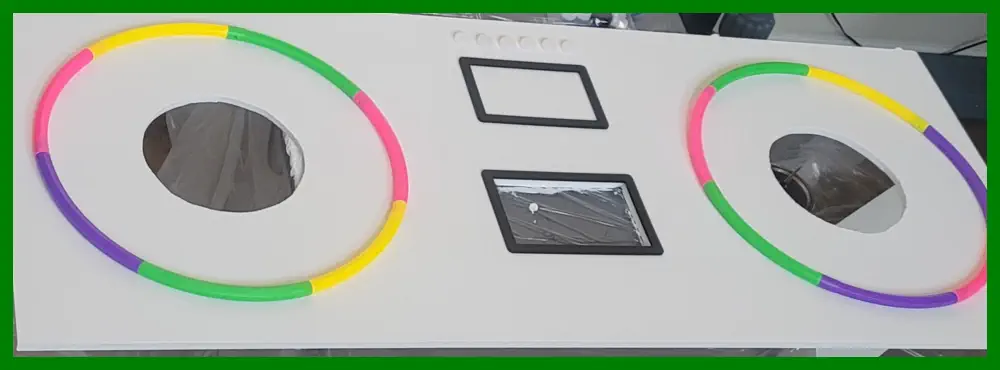
Boombox Bar/DJ Booth lower half progression
1.
Start with blank 4ft.x6ft.
particle board - in pencil draw
out basic shapes for spacing.
2.
Layout hula hoops, plasitic
lids, plates, tape deck and
equalizer for spacing.
3.
Next we cut holes for
speakers and equalizer and
painted the whole thing white.
4.
It was then painted silver, the
area behind the hula hoops
were spray painted in neon
green, custom vinyl decals
were put in place, and the
speaker covers, tape deck,
and equalizer was glued in
place.
5.
The end result after adding
LED lighting, and all the
finishing touches!
The equalizer on the Boombox was a really cool detail that
seemed to move with the beat and gave a great added effect.
Above is a look at the back of the Boombox so you can see
how the equalizer works. The frames for the tape deck and
equalizer were actually packaging for tablet covers. We just
happened to have them laying around. They worked out
perfect for this project but I have seen others use paper trays
to also create this look. We bought acrylic sheets which we
cut to size to give the look of glass. Then using my Cricut I
made the equalizer bars out of black vinyl which I attached to
the acrylic sheet. On the back using a plastic storage
container from the Dollar Store we stuffed the container with
these amazing twinkling lights and covered them with two
layers of bubble wrap to soften the look from the front. The
lights are battery operated so we just used a portable power
bank to give them power.
Boombox Bar/DJ booth Equalizer
In conclusion, this Boombox Bar and DJ booth wasn’t a super
difficult project to construct. However, the level of detail is
what took the most time. If you are thinking about making
your own Boombox Bar/DJ booth I encourage you to have fun
with it and add your own style and details. It wasn’t until we
were ready to attach the details that we finalized our layouts.
We also spent some time gathered lots of container lids with
various sizes to use as the knobs. The buttons to the tape
deck were trim pieces cut into 1 inch pieces and painted. So
feel free to get creative you can make it whatever you want it
to be! Thank you for reading! Happy crafting!
Ligthing was a huge part of this Boombox Bar & DJ booth.
We used four LED light strips for the bottom and top speakers
and a strand of twinkle lights to give the equalizer the effect of
movement.
On the backside of the bar the top light strips were long
enough to provide some lighting along with some puck lights
so the bartender/DJ could see what they were doing.
We also bought these amazing DJ disco ball lights which
danced with the music.
For our party we used a portable bluetooth speaker for music.
We placed the speaker under the table and next to one of the
speaker holes. Then we blasted 80’s music all night long.
Boombox Lighting
A great party always has a focal point or a real wow factor
that gets your guests excited to party. For our 80’s glow
birthday party we created this Boombox Bar & DJ booth.
This is how we did it and how you can too!
*This site contains affiliate links. For more information see our disclosures
here.